In this second post of my series about how I created a small visual novel with Ink and Godot, I’m going to provide an overview of my visual novel system. I’ll talk about how I got setup, how my runner works, and what is possible using Ink tags. (Looking for part 1? Click here.)
What You’ll Learn in This Post – How to set up Ink with Godot (C# version) – How I structured my visual novel UI – How my VN runner works (conceptually) – How Ink tags control visuals, audio, and layout
- How to set up Ink with Godot (C# version)
- How I structured my visual novel UI
- How my VN runner works (conceptually)
- How Ink tags control visuals, audio, and layout
Setting up Ink with Godot
Step 1: Create a Godot Project (C# / Mono)
To get started with Ink, you first need an Ink story (covered in part one). Once you have an Ink story, it’s time to create a new Godot project.
⚠️ An important note: Godot Ink (the Ink plugin for Godot) requires C#. What this means is that the Steam version of Godot won’t cut it, because it doesn’t support .NET. You will be wanting to download the mono version of Godot and edit there. When I tried to get started with Ink, I used the Steam version, and I had a sudden blood pressure spike when I tried to create a C# solution as the start docs instructed, and found no such tool available.
Step 2: Add the GodotInk Plugin and Create a C# Solution
This is already covered in Ink’s official docs, but here’s the high-level version. (https://github.com/paulloz/godot-ink/wiki#-quick-start-guide Once you have a new Godot project, the first thing to do is add the Godot addon to your project.
Activating it at this point won’t work and will throw an error, as you need to create a new C# solution. That can be achieved by going to Project > Tools > C# > Create C# Solution.
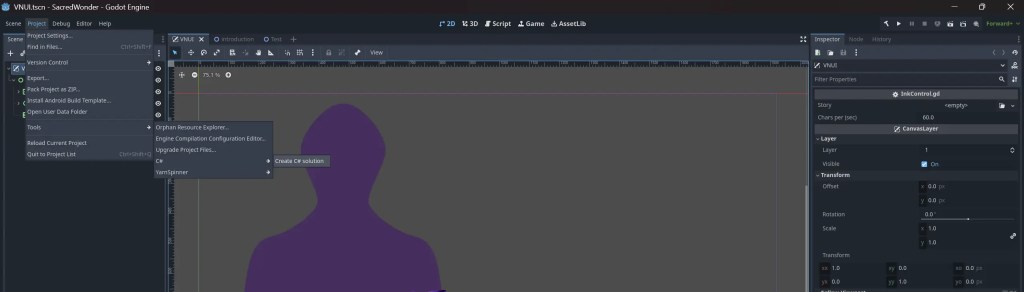
Once that’s done, you will see a C# project source file in your game directory. What you want to do is open that up in Visual Studio Code and add this line:
<Import Project=“addons\GodotInk\GodotInk.props” />
before the project closing tag. Save that, and then head back to your game.
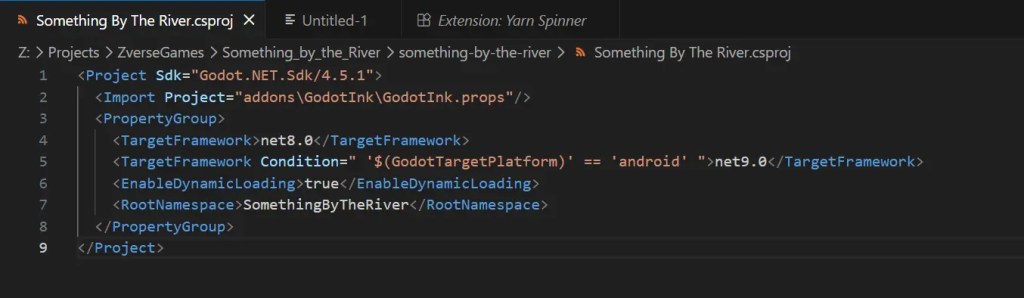
Step 3: Build and Enable Ink
Build it (click the little hammer in the top right corner). You should now be able to activate Ink through your Project Settings > Addons window. Yay! We’re getting somewhere.
Step 4: Import your Ink story
Use the Import panel to bring in your Ink story.

Creating a basic UI to handle the visual novel system
Before building the runner, I set up the UI first within Godot, because the runner ultimately exists to feed content into that UI. After all, the Ink story has to go somewhere, and that somewhere, is a UI. When those two things work together, you have a complete visual novel system.
When I first started using Godot, I had a challenging time understanding how to position elements on the screen. What helped me was drawing on my experience designing UIs for Unreal and Roblox, and thinking about anchor points as percentages. I also found that things became more understandable for me once I translated my experiences working with web layouts to layout in Godot.

In this screenshot, you can see I have created a UI scene (this is my Dialogue UI). Inside this scene exists a parent Control node that has anchor points set to Full Rect. What this means is that it occupies the entire viewport 1-1. Within the Control node lives a Margin Container, where I’ve placed a TextureRect. The TextureRect itself has been set to Full Rect as well, which means it fills the entire space of its parent (in this case, the Margin Container).
What you’ll note is the anchor points of that Margin Container. It has been set to Bottom: 1 (which here means it takes 100% of the vertical) and Right: 0.5 (50%). Once you have the hang of anchor points and offsets, it becomes very straightforward to design any layout you can think of.
I’ll go into more detail on the design-as-craft aspect of the layout in part 3 of this series.
Building blocks of a visual novel system’s UI
My UI features these elements:
- A name box, which contains the name of the character who is talking.’
- A dialogue or text box, which is where the actual passage content is located
- An area for character artwork
- And lastly an area on the screen where choices are located. In my case, I’ve created a Vbox, within which is instantiated a Choice button (contained in a different scene).
If you follow the starter guide from Godot Ink’s creator, the method is a little different, but if you’re looking for a fancier looking button, then creating your own and instantiating it via script.
Personally, my habit is to design the UI first, but this step is not necessary at this stage. All that is really required is the layout itself, which could very well be nothing more than TextureRects or panels. Basically, grey-boxing the UI before it’s properly styled. For me, however, I find that UI really helps to lock in a game’s art direction, and in a visual novel, which is very dependent on artwork, getting that out the door first is a big help.
A hybrid approach to UI for visual novels
In Something by the River, as with Gemseeker, I take a hybrid approach with my visual novel, which is to say, I have a UI for dialogue (two characters speaking), narration (internal monologue by the player character) and novel (third-person narration). In my Ink tags, you’ll note that I specify the style, allowing me to switch between these UIs on the fly.
This approach lets me shift tone instantly — from dialogue to internal monologue to third-person narration — without changing the underlying system.
All I do to create these additional UIs is to duplicate a UI scene and change anchor points (and swap out assets). I don’t delete any nodes, nor make changes to the hierarchy. Anything I don’t need, I simply hide. This allows for flexibility later if I, for example, decide I actually do want character artwork in the Novel UI, but more importantly, it means that locating nodes in the scene hierarchy works the same no matter which UI is used.
Developing a runner for an Ink-based visual novel in Godot
I find that it helps to think of the runner as a traffic controller.
It does not write the story. It does not create the UI art. And, it does not decide what the choices mean.
Instead, it sits in the middle and keeps asking:
- “What does Ink want to show next?”
- “Which UI layout should be visible for this line?”
- “Where do I put the text?”
- “Are there choices now, or should I wait for a click?”
- “If the player clicked, should I skip typing or move to the next line?”
That’s basically the whole job.
At runtime, my script works in this order:
- Godot loads the scene.
- _ready() runs automatically.
- _ready() finds the UI scenes and starts the Ink story.
- _ready() calls _advance_story().
- _advance_story() asks Ink for the next line.
- _apply_current_tags() checks tags like style:Novel.
- _set_active_ui() switches to the correct layout.
- _type_text() types the line into the current text box.
- _show_choices_or_wait() decides whether to:
- show buttons
- or wait for player input to continue
- _input() listens for clicks / Enter and either:
- skips typing
- or advances to the next line
That loop repeats until the story section ends. It’s worth pointing out again that there are many different ways to script your visual novel system, and you might have more or less functions depending on what you are trying to do. You might not have any choices at all, or your might be handling them in a different way.
The role of tags within Ink:
Ink allows for tags to be appended to the top of passages. I think of these tags as being similar to signals within Godot. These tags work in tandem with nodes that exist inside of a given scene in Godot. In the screenshot, you’ll notice there is a portrait container (a texture rect). When Godot sees the tag #portrait: xakol, it searches through a dictionary of portraits set in my game’s script, and applies the corresponding portrait to that texture rect. That same principle can be applied to things like background images and even sound effects.
Once the runner is working, believe it or not, the functionality for my visual novel was basically done. I think it took me about a day to complete.
In part three, I’ll dive into the art side of things: designing interfaces, characters, and my approach to developing the story for this small project.
The rest of the series:
→ Part 1: Overview
→ Part 2: Building the VN System
→ Part 3: Art and Design
→ Part 4: Exporting the game


